February 24, 2010

day 20

Once again, out my front door.

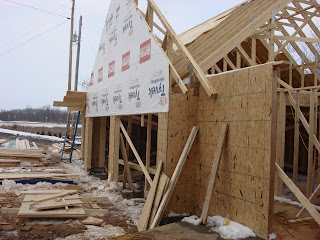
Here they are building the roof on the garage and adding the eave.
You can see the massive room above the garage now that part of the roof is on.
Putting the roof onto the garage and one side of the eave.
This is a view of the retaining wall that we have to build because of the grade of the yard.
Now, when I came around the corner to see this, I about pooed my britches.  This is the deck that my husband and a friend of his built with their own two hands.  It is pretty cool and the framers have cut into it!!  AHHHH!  I know that it is hard to see in this picture, but you can see where they have put braces on it, since they cut it off of the house.  (Had to since we are bricking the back of the house, but holy smoke!)
A closer view of the destruction of the deck.  Hubby was totally cool with it.  I think I had a harder time with it than he did.  Still look at it everyday out of my kitchen window and can't believe it.  Good thing it's not summer time and we are constantly out on our deck cooking and what not.

Til tomorrow, or whenever I update again.  Thanks for keeping up with me.


February 22, 2010

day 19

Okay....the last time I updated you about the house remodel we were on day 14.  Well, the family and I went to Orlando for a week and enjoyed the nice warm weather there, while our friends and family stayed back home for a really nice snow storm.  Anyway, while were gone, my guys worked hard but I don't have pics to show the process.  So.....this is what it looked like out the front door when we got back from our week long vacation.  See the snow!!!

This is the wall to my laundry room and the entryway hall. 


The garage.
My new laundry room.  Yea!!!!
The stairway up to the bonus room, which will eventually become the hunting and craft room.
The bonus room....holy smokes this room is giant!
Another view of the garage and the front of the house.
More of the garage.

When we came around the corner after our vacation trip, I didn't even recognize my house.  Even now, it takes me a minute.  I can't believe that this is going to be my house.  I'm so excited to start decorating and all that good junk!  I'll try to update again soon.  Thanks for looking.

February 19, 2010

SLACKER ALERT!!!

Okay, okay....I know those of you who follow me are thinking, "Where in the heck has this girl gone?  She is such a slacker!"  Well, yes, I am a slacker (you already know that if you know me) and two, I have been busy with my house and been sick for the last two weeks. 

I have a ton of pics that I want to share with you on the house remodel but I have priorities also.  (Like taking care of myself, my husband and my kids.)  =0)  Anywhooooo....I'm going to start uploading pics for you and just stay patient....I'll get you caught back up to speed. 

Thanks for keep checking back for updates.  I love you all!

February 5, 2010

Old School Valentine's

I was checking out a new flea market in town with my AIL and came across these adorable old school valentine's cards.  They are so cute and when I looked at them closer, they were definately the ones that we took to school on heart day and gave to everyone in our class.  All three of these were to Eugene from three of his male classmates.  I thought that was kind of odd, but I remember writing cards to other girls in my classes when I was in elementary school.  (Guess it isn't that odd after all.)


So, I came up with this little idea on how to display them.  Nothing original or anything like that I am sure, but I like them and they go with my decor a whole lot better than red and pink.

I picked up three real expensive frames, at the dollar tree and removed the glass and backing.  It doesn't matter that they don't match.  I am going to spray paint them.  I was more intrigued by the details on the frames themselves.


I took them into my garage and spray painted them a satin almond color.  In case you can't imagine what that looks like....here is a pic of that.  =)


Once those frames dried, I brushed the frames with my antiquing glaze and then wiped off to achieve the look that I wanted.  I then took strips of ribbon and glued them onto the backing of the frames.  Once I got them all glued down I placed the valentine's on top of the backing and re-inserted the glass and backing into the painted, antiqued frames.  This is how it turned out.


Up close photos...


I think that they are pretty cute.  Thanks for looking.

February 3, 2010

LOVE

I finally found my "l" to finish my project.  I updated the original post.  Check it out here.  Hope everyone likes it.  Thanks for looking!


Related Posts Plugin for WordPress, Blogger...